
Injection Molding Gate Blush Causes: How to Prevent Gate Blush and Jetting
Gate blush and jetting are two common surface defects in plastic injection molding.To prevent gate blush, review gate size and geometry, injection speed, melt and mold temperatures, and material preparation. To prevent jetting, optimize the initial injection speed, adjust the gate location and entry direction, and help the melt establish a stable flow front against the cavity wall.
However, they develop through different mechanisms and often require different corrective actions. Gate blush typically appears as a cloudy, hazy, or discolored area around the gate. Jetting produces a snake-like flow mark when molten plastic enters the mold cavity as a fast, uncontrolled stream. If the underlying cause is not identified correctly, adjusting injection speed or temperature alone may not solve the problem.
For manufacturers producing rapid prototypes, low-volume parts, or production components, preventing these defects early can reduce scrap, avoid unnecessary mold modifications, and improve production consistency. This guide explains the main injection molding gate blush causes, how to prevent jetting in injection molding, and how gate design affects surface quality, including when molding glass-filled plastics.
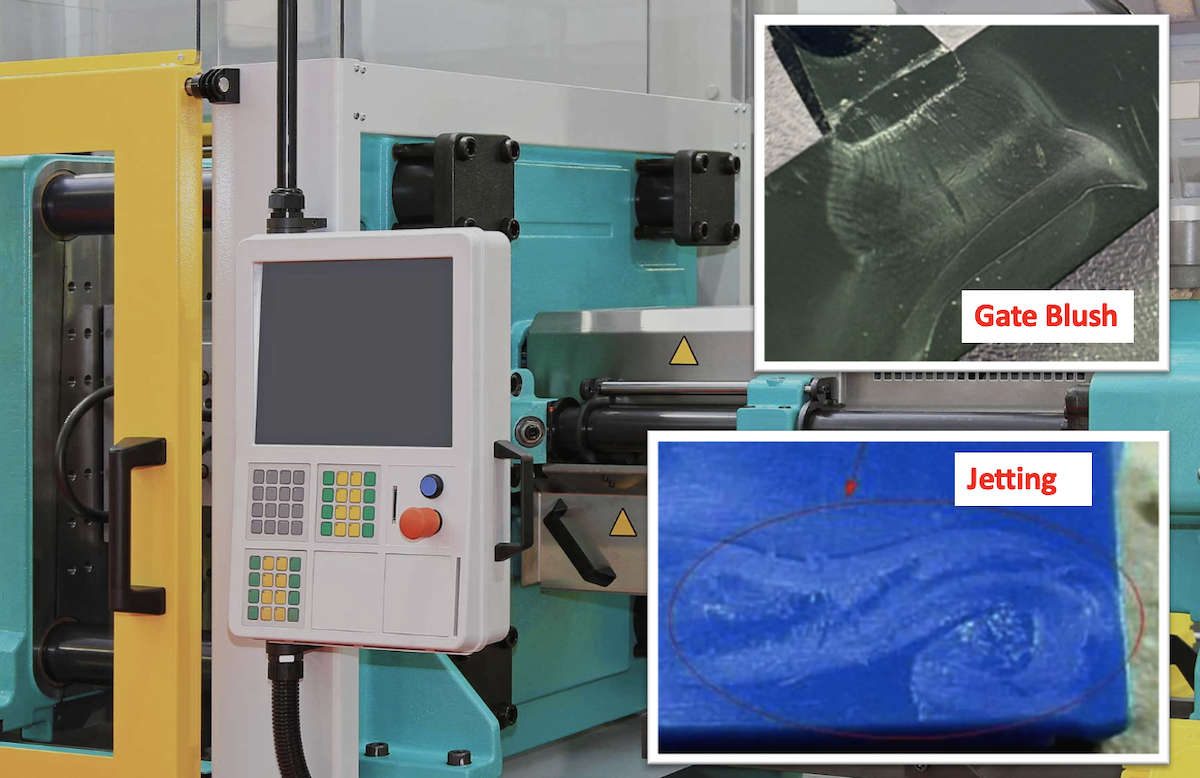
What Are Gate Blush and Jetting in Injection Molding
Gate blush and jetting can both occur near the gate, but their appearance and formation are different. Identifying the defect correctly is the first step toward choosing an effective solution.
What Does Injection Molding Gate Blush Look Like
Gate blush is a visible surface imperfection around the gate area of an injection molded part. It may appear as a cloudy patch, a hazy ring, a dull area, or a localized change in gloss or color.
The defect is often associated with the way molten plastic flows through the gate and fills the cavity. High local shear, rapid changes in flow conditions, and unsuitable processing parameters can contribute to the problem. The exact mechanism depends on the resin, gate geometry, and molding conditions.
Gate blush is particularly noticeable on glossy, transparent, or dark-colored plastic parts. Even when the part meets its dimensional requirements, the visible mark may cause it to fail cosmetic inspection.
Common contributing factors include:
- Excessive injection speed through a restrictive gate.
- Gate geometry that creates high local shear or an abrupt flow transition.
- Unsuitable melt or mold temperatures.
- Material-specific flow and surface characteristics.
- Inconsistent processing conditions.
Not every cloudy or silver-colored mark near the gate is gate blush. Moisture-related splay, trapped gas, and other flow marks can look similar, so the defect should be identified before corrective action begins.
What Does Jetting Look Like on an Injection Molded Part
Jetting occurs when molten plastic shoots through the gate into the open cavity as a narrow stream instead of spreading smoothly along the mold wall.
The stream may cool partially before the surrounding melt reaches it. When the material subsequently fills around the stream, the result can be a snake-like, worm-shaped, or irregular flow mark on the finished part.
Jetting is often associated with the initial filling stage, when the melt has not established a stable flow front.
Common causes include:
- Excessive initial injection velocity.
- Gate placement that directs the melt into an open cavity.
- Gate geometry that encourages a narrow, high-speed stream.
- Flow paths that allow the melt to travel freely before contacting a cavity wall.
- Processing conditions that contribute to unstable filling.
Jetting can occur with many thermoplastic resins. Its severity depends on the material's flow behavior, part geometry, gate design, and injection profile.
Gate Blush vs. Jetting: Key Differences
|
Feature |
Gate blush |
Jetting |
|
Typical appearance |
Cloudy, hazy, or localized gloss change |
Snake-like or worm-shaped flow mark |
|
Common location |
Around or near the gate |
Along the initial melt-flow path |
|
Main concern |
Localized surface appearance |
Unstable melt entry and flow-front formation |
|
Typical corrective actions |
Review gate geometry, local shear, and processing conditions |
Optimize initial injection speed, gate direction, and flow pattern |
|
Tool modification |
May be needed if gate geometry is a contributing cause |
May be needed if the gate directs the melt into open cavity space |
The two defects can occur together, but one should not be treated as the other. A cloudy gate area calls for a different investigation from adistinct, snake-like flow mark.
What Are the Main Injection Molding Gate Blush Causes
Understanding injection molding gate blush causes helps molders avoid trial-and-error adjustments that waste production time. Start by examining the defect location, the resin being used, and the conditions around the gate.
Excessive Injection Speed and Shear Heating
Molten plastic experiences high shear as it passes through a narrow gate. If injection speed is excessive for the material and gate geometry, the resulting flow conditions can contribute to localized surface defects.
However, high injection speed is not always the cause. Some resins require relatively high filling speeds to prevent premature freezing or other flow-related problems.
The appropriate response is to evaluate the injection profile rather than automatically reducing the overall filling speed.
What to check:
- Review the initial injection speed and the speed used as the cavity fills.
- Examine whether the gate is restrictive for the selected material.
- Check the recommended processing window for the resin.
- Compare parts produced with controlled changes to the injection profile.
If reducing the initial speed improves the surface, further trials can help determine whether the problem is mainly process-related or whether gate redesign is necessary.
Gate Size, Shape, and Location
Gate design has a direct influence on how molten plastic enters the cavity. A small or poorly positioned gate can create high local shear, an abrupt change in flow direction, or a concentrated stream of material.
These conditions may contribute to gate blush or jetting, depending on how the melt behaves after passing through the gate.
Gate location also affects where the defect appears. A gate placed on a prominent cosmetic surface may make a relatively small flow imperfection unacceptable.
When reviewing gate design, consider:
- Gate cross-sectional area and thickness.
- Gate type and entry direction.
- The distance between the gate and the nearest cavity wall.
- Wall thickness and changes in section thickness.
- Cosmetic requirements and the visibility of the gate mark.
- The effect of gate changes on filling balance and packing.
Increasing the gate size may reduce local shear in some cases, but it is not a universal solution. Gate changes must be evaluated against filling pressure, packing requirements, gate vestige, cycle time, and part appearance.
Melt Temperature, Mold Temperature, and Material Moisture
Processing temperatures affect melt viscosity, flow behavior, and the way the material develops its surface during filling.
If the melt temperature is too low for the selected resin, the material may fill poorly or freeze prematurely. Excessive temperatures can also create material-specific problems, particularly if the resin is sensitive to thermal degradation.
Mold temperature influences how quickly the melt cools against the cavity surface. Its effect on gate blush depends on the resin, mold design, and processing conditions.
Moisture requires separate attention. Moisture-sensitive materials, including certain grades of polycarbonate, polyamide, and other engineering plastics, may produce splay or silver streaks when improperly dried. These defects can be mistaken for gate blush.
Practical checks:
- Confirm that the material is suitable for the application and has been stored correctly.
- Verify drying temperature and time against the resin supplier's recommendations.
- Check actual melt and mold temperatures rather than relying only on machine setpoints.
- Inspect the defect pattern to distinguish gate-area blush from moisture-related splay.
- Change one relevant parameter at a time and document the result.
Correct material handling can eliminate some surface defects, but it will not correct a gate geometry problem that creates unstable flow.
Resin Type, Fillers, and Pigments
Different thermoplastics respond differently to injection speed, temperature, and gate geometry. A process that produces an acceptable surface with one resin may cause visible defects with another.
Glass-filled materials introduce additional considerations because the fibers influence flow behavior, orientation, and surface appearance. Depending on the resin and part geometry, fiber orientation can contribute to visible differences in texture or gloss.
Pigments and colorants can also affect how easily a defect is seen. Dark, glossy, or highly cosmetic parts often reveal surface variations that may be difficult to notice on natural or textured materials.
When troubleshooting, use the actual production-grade resin and color whenever possible. A process validated with an unfilled or differently colored material may not transfer directly to the final production material.
How to Prevent Jetting in Injection Molding
Preventing jetting in injection molding requires controlling how the melt enters the cavity. The objective is to establish a stable flow front instead of allowing a narrow stream to travel freely through open space.
Reduce Initial Injection Speed and Optimize the Fill Profile
One of the first adjustments to consider is the initial injection speed.
If the melt enters the cavity too quickly, it may form a narrow jet before contacting a cavity wall. Reducing the initial speed can give the material time to spread and establish a more stable flow front.
In many applications, a staged injection profile is more effective than using one constant speed throughout filling.
A typical approach is to:
- Begin filling at a controlled, relatively low speed.
- Allow the melt to contact the cavity wall or establish a stable flow front.
- Increase injection speed when appropriate for the remaining filling stage.
- Adjust the velocity-to-pressure transfer point to maintain consistent filling.
- Inspect the resulting parts and compare the defect severity.
The best profile depends on the resin, gate dimensions, cavity geometry, and required cycle time. Reducing speed too much can introduce short shots, premature freezing, or other filling problems.
Redirect Melt Flow Against the Mold Wall
Gate placement can be as important as injection speed.
When the melt enters a large, open cavity without encountering a nearby surface, it may continue as a narrow stream. Designing the gate so that the melt contacts a cavity wall or a suitable impingement surface can help the material spread more evenly.
During mold design, consider the following:
- Position the gate to encourage stable flow along the cavity surface.
- Avoid directing the melt into an unnecessarily large open space.
- Evaluate how the initial flow path interacts with ribs, bosses, and changes in wall thickness.
- Consider the cosmetic requirements of the surface opposite or adjacent to the gate.
The correct approach depends on the part geometry. A gate position that works well for a compact housing may not be suitable for a long, thin-walled enclosure.
Adjust Gate Size and Gate Location
If process adjustments do not resolve jetting, review the gate itself.
A gate that is too restrictive or directs the melt into an unsuitable flow path may require modification. Options include changing the gate cross-section, relocating the gate, adjusting its orientation, or evaluating a different gate type.
Before modifying the mold, consider the potential effects on:
- Filling pressure and flow balance.
- Weld-line location.
- Packing and shrinkage.
- Gate removal and visible gate vestige.
- Part strength and fiber orientation.
- Tooling cost and lead time.
Gate redesign should solve the underlying flow problem without creating a new defect elsewhere in the part.
Optimize Melt Temperature and Viscosity
Material viscosity affects how easily the melt flows through the gate and spreads through the cavity. Melt temperature is one factor that influences viscosity, but increasing temperature is not always the correct response to jetting.
Start with the resin supplier's recommended processing range. Confirm that the actual melt temperature is appropriate and consistent, then assess whether a temperature adjustment improves the flow pattern.
If the defect persists despite reasonable process optimization, the gate design and initial flow path deserve closer attention.

Gate Design for Glass Filled Injection Molding
Gate design for glass filled injection molding requires additional care because the glass fibers can affect flow behavior, surface appearance, and mechanical performance. A gate must allow the material to fill the cavity reliably while managing fiber orientation, pressure requirements, and potential wear on the tooling.
How Glass Fibers Affect Melt Flow and Surface Appearance
Glass-filled thermoplastics contain reinforcing fibers that orient according to the local flow field. This orientation can affect stiffness, strength, dimensional stability, and surface appearance.
Near the gate, the flow direction and geometry may produce a different fiber orientation from that found farther into the cavity. Depending on the resin formulation and molding conditions, these differences can contribute to visible surface variations.
Glass fibers can also increase abrasion on gates, runners, and other tool surfaces. Gate dimensions and tooling materials should therefore be selected with the reinforced resin in mind.
When investigating surface defects in glass-filled parts, check both the general flow pattern and the appearance of the fibers near the gate. A visible mark may be related to flow-induced fiber orientation rather than gate blush alone.
Choosing Gate Type and Size for Glass-Filled Resins
Several gate configurations may be suitable for glass-filled injection molding. The correct choice depends on the part geometry, resin, cosmetic requirements, and production objectives.
- Edge gate:An edge gate is commonly used for parts that can be filled from an outer edge. Its size and position can be adjusted to influence the flow pattern and gate vestige.
- Fan gate:A fan gate spreads the melt across a wider entry area. It may help distribute flow across a broad section, although its effectiveness depends on the part geometry and the required fiber orientation.
- Tab gate:A tab gate introduces material through a small tab that can help manage the initial flow into the cavity. It may be useful for certain cosmetic or flow-sensitive applications.
- Other configurations may be appropriate depending on the mold design. No single gate type is best for every glass-filled component.
The design review should consider gate thickness and width, the expected pressure drop, the desired fiber orientation, and whether the gate can be manufactured and maintained reliably.
Preventing Gate Blush Without Compromising Part Strength
A gate change that improves appearance may also change the local fiber orientation or the way the cavity packs. For structural components, these effects must be evaluated alongside cosmetic quality.
Before finalizing a gate modification:
- Review the mechanical requirements of the part.
- Assess the expected fiber orientation and flow pattern.
- Confirm that the gate supports adequate filling and packing.
- Check whether the gate is likely to wear under repeated molding cycles.
- Validate the revised design using molding trials and relevant inspections.
The goal is not simply to eliminate a visible mark. It is to achieve an acceptable surface finish while maintaining the part's required mechanical and dimensional performance.
How to Troubleshoot Gate Blush and Jetting on the Production Floor
A structured troubleshooting process helps identify the root cause without making several changes at once. It also creates a documented basis for repeatable production.
Step 1: Inspect the Defect Location and Pattern
Start by examining where the defect occurs.
A cloudy or hazy area concentrated around the gate may indicate gate blush. A snake-like mark extending along the initial flow path is more consistent with jetting.
Also check whether the defect appears consistently across all parts or varies from shot to shot. A repeatable pattern may point toward gate geometry or a stable process condition, while inconsistent results may justify checking material preparation, machine performance, and process stability.
Photographs of the defect can help compare samples before and after adjustments.
Step 2: Check Resin Preparation and Processing Conditions
Verify the resin grade, material handling, drying requirements, and actual molding conditions.
Review the initial injection speed, melt temperature, mold temperature, and filling profile. Check other parameters when relevant to the material and defect, rather than changing every setting at once.
For moisture-sensitive resins, confirm that the drying process follows the material supplier's instructions. For glass-filled materials, ensure that the production resin matches the grade used during process development.
Step 3: Run Controlled Molding Trials
Make one targeted change at a time and document the result.
For example, if jetting appears immediately after the melt enters the cavity, test a lower initial injection speed while keeping other relevant settings stable. If the defect improves, refine the filling profile and check whether the change affects cycle time or other quality characteristics.
If the defect remains unchanged, investigate gate geometry and melt entry direction.
A trial record should include the material grade, relevant process settings, defect observations, and inspection results. This information is particularly valuable when the same part will be produced in multiple batches.
Step 4: Review Gate Design and Mold Flow
When reasonable process adjustments do not resolve the defect, review the tooling.
Check whether the gate is restrictive, whether its orientation encourages an unstable stream, and whether the initial flow path is suitable for the cavity geometry.
Mold flow analysis can help assess filling patterns, pressure requirements, potential weld-line locations, and other design considerations before making a physical modification.For more information, see TEAM Rapid's injection mold flow analysis.
Simulation is a useful design tool, but actual molding trials remain important for confirming the final process and surface quality.
How to Handle Gate Blush and Jetting in Low-Volume Injection Molding Production
Gate blush and jetting can be especially costly during low-volume injection molding. When an order contains only 50, 100, or 500 parts, scrapping a batch or modifying the mold late in the project can significantly increase the cost per acceptable part. Delivery schedules may also leave little room for repeated tooling trials.
The best approach is to identify the defect early, protect the remaining production quantity, and determine whether the problem can be corrected through process adjustments or requires a tooling change.
1. Stop and Inspect Before Producing More Parts
When gate blush or jetting first appears, do not continue running the entire order while assuming the defect will disappear.
Inspect several consecutive parts and determine whether the problem is consistent or intermittent. Record where the defect appears, how severe it is, and whether it affects every cavity in a multi-cavity mold.
Check the following:
- Gate blush: Is the cloudy or hazy area concentrated around the gate? Does its appearance change between shots?
- Jetting: Does a snake-like mark follow the initial melt-flow path? Does it appear immediately after the melt enters the cavity?
- Consistency: Are all parts affected, or does the defect occur only occasionally?
- Acceptance criteria:I s the defect on a cosmetic surface, a hidden surface, or an area that affects assembly or function?
Compare the results with the approved sample or customer appearance requirements. A visible gate mark may be acceptable on a hidden surface but unacceptable on a consumer-facing enclosure.
If the defect exceeds the agreed acceptance criteria, isolate the affected parts while the cause is investigated. This prevents questionable parts from being mixed with conforming production.
2. Try Process Adjustments Before Modifying the Mold
For low-volume orders, a tooling modification can add cost and delay delivery. Before making that decision, check whether the defect can be corrected within the resin's recommended processing window.
For jetting, begin by reviewing the initial injection speed. A controlled reduction in the initial filling speed may allow the melt to contact the cavity wall and establish a stable flow front. If the defect remains, inspect the gate's entry direction and the available space in front of it.
For gate blush, review the gate geometry and the injection conditions around the gate. A restrictive gate combined with unsuitable filling conditions may contribute to localized shear and visible surface changes. Test appropriate adjustments to injection speed and temperatures while monitoring the resulting surface finish.
Use a controlled trial:
- Record the current machine settings and photograph the defect.
- Change one relevant parameter at a time.
- Produce a small number of trial parts.
- Compare the results against the original samples.
- Check for new defects, including flash, short shots, sink marks, and dimensional changes.
- Record the settings that produce acceptable parts.
For insert molding and overmolding, also check whether the insert or substrate affects the melt-flow path. Insert position, surface geometry, material temperature, and the location of the gate relative to the insert can influence filling behavior. In overmolding, the first-shot component may obstruct flow or create abrupt changes in cavity geometry, increasing the risk of visible flow marks.
Important: Do not automatically reduce injection speed for every gate-related defect. Excessively slow filling can cause premature freezing or short shots. The objective is to establish a stable, repeatable process, not simply to use a lower speed.
3. Decide Whether the Gate Needs to Be Modified
If process adjustments do not resolve the defect, review the gate design before continuing the production run.
For jetting, the gate may direct molten plastic into open cavity space, allowing it to form a narrow stream before reaching a mold wall. Changing the gate position, orientation, or configuration may help the melt spread more naturally.
For gate blush, check whether the gate is too restrictive or creates unfavorable local flow conditions. A gate modification may reduce the problem, but the design must also support adequate filling, packing, and gate removal.
Before authorizing mold rework, consider three questions:
- Can the existing mold produce acceptable parts with a stable process?
- Will the proposed gate modification address the identified root cause?
- Is the expected improvement worth the tooling cost and schedule impact for the remaining quantity and future demand?
For a small order, a mold modification may not be economical if only a few parts remain to be produced. However, if the part will be reordered or the defect is likely to recur during bridge production, correcting the gate may provide better long-term value.
In insert molding and overmolding, consider whether the gate directs the melt against an insert, around a substrate, or into a narrow section. These features can change the flow path and should be considered when evaluating gate location and size.
The decision should be based on the technical cause, customer requirements, remaining order quantity, and expected future demand—not on tooling cost alone.
4. Protect the Remaining Quantity and Delivery Schedule
When the production deadline is close, the immediate priority is to prevent further scrap while establishing a reliable corrective action.
Work with the molding team to determine whether the current process can produce conforming parts consistently. If it can, document the approved settings and monitor the next production samples closely. If it cannot, agree on a tooling or process correction before restarting the full run.
For low-volume production, useful controls include:
- Inspecting the first parts after each process adjustment.
- Recording the material batch and relevant molding settings.
- Keeping defective parts separate from accepted parts.
- Confirming the required appearance and dimensional criteria before releasing the batch.
- Allowing time for additional trials when planning future orders.
Do not rely on a single good sample as proof that the problem has been solved. The process should produce acceptable parts consistently under the agreed production conditions.
If a customer approval sample is required, confirm that the revised parts meet the approved specifications before shipping the remaining order.
5. Prevent Repeat Defects in Future Low-Volume and Bridge Production
A defect that appears during a small production run can reveal a design or process weakness that may become more expensive when demand increases.
Before the next order, review the results of the troubleshooting work and update the manufacturing documentation. Record the final gate design, approved resin, material preparation requirements, process settings, and inspection criteria.
If the project is moving from prototype tooling to bridge production or a higher-volume production mold, reassess whether the existing gate design remains suitable for the expected quantities and quality requirements. For insert molding, record insert position and any relevant preheating or handling requirements. For overmolding, document the first-shot component's condition, placement, and temperature requirements where applicable. These factors can affect how the second shot fills the cavity.
A design that works for a short run may still require optimization for a production tool with different cooling, filling, cycle-time, or tool-life requirements. Do not assume that the same settings will transfer unchanged to a different mold.
Early design review and mold flow analysis can help evaluate gate location, filling behavior, and potential flow-related risks before the next tool is manufactured.
For manufacturers, the key lesson is simple:use every low-volume production run to validate both the parts and the process.Identifying and correcting gate blush or jetting early can reduce scrap, avoid repeated troubleshooting, and make the transition to bridge or full-scale production more predictable.
When Should You Modify the Injection Mold Instead of the Process?
Not every surface defect requires a tooling change. Process optimization should generally be investigated first, provided the resin is being processed within its recommended limits.
Signs That Process Optimization May Be Enough
Process adjustments may be sufficient when the defect responds consistently to changes in the initial injection speed, filling profile, or suitable temperature settings.
Before accepting the revised process, confirm that the improvement is repeatable and that the change does not introduce short shots, flash, excessive cycle time, or other quality issues.
The final process should be documented so that future production runs can reproduce the acceptable result.
Signs That Gate Redesign or Tool Modification Is Needed
Tool modification may be necessary when the gate itself creates an unfavorable flow path or excessive restriction.
Common warning signs include:
- Jetting persists despite reasonable changes to the initial injection profile.
- Gate blush remains concentrated around a restrictive or poorly designed gate.
- The gate directs material into open cavity space and encourages free-stream flow.
- The required process settings create other unacceptable defects.
- The part design or cosmetic requirements demand a different gate location.
Potential solutions include enlarging or reshaping the gate, relocating it, or changing the gate configuration. Each option should be evaluated against tooling cost, lead time, part quality, and production requirements.
How DFM and Mold Flow Analysis Can Reduce Rework
Design for manufacturability (DFM) reviews help identify potential molding issues before the mold is built.
- A useful review considers gate placement, wall thickness, flow distance, ribs, bosses, cosmetic surfaces, material selection, and the expected production quantity.
- Mold flow analysis can provide additional insight into how the melt may fill the cavity and where potential flow-related problems could occur.
- These checks are valuable when developing new parts because changing a gate before tooling manufacture is often simpler than reworking a completed mold.
Frequently Asked Questions About Gate Blush and Jetting
Q: What causes gate blush in injection molding?
A: Gate blush can result from localized shear, unsuitable injection conditions, gate restrictions, and material-specific flow behavior. Melt and mold temperatures can also influence the outcome. The correct cause should be established by examining the defect pattern, resin, gate geometry, and processing conditions.
Q: How do you fix gate blush on plastic parts?
A: Start by confirming that the defect is gate blush rather than moisture-related splay or another surface mark. Check resin preparation and processing conditions, then evaluate injection speed and gate geometry. If the defect persists, consider whether the gate requires modification.
Q: How to prevent jetting in injection molding?
A: Control the initial injection speed, optimize the filling profile, and design the gate so that the melt establishes a stable flow front. If process changes do not solve the problem, review the gate's size, position, and entry direction.
Q: Can a larger gate eliminate gate blush and jetting?
A larger gate may reduce local shear or change the melt entry pattern in some applications, but it will not solve every defect. Jetting may be caused primarily by the direction of the melt entering the cavity. Gate changes must be evaluated against filling, packing, gate vestige, and part appearance.
Q: Does glass-filled plastic increase the risk of gate blush?
A: Glass-filled plastics introduce additional considerations because fiber orientation can affect surface appearance and mechanical properties. However, glass fiber alone does not establish the cause of gate blush. Resin formulation, gate geometry, and processing conditions must also be considered.
Q: Can gate blush and jetting be prevented through mold design?
Good mold design can reduce the risk of both defects through appropriate gate placement, suitable gate dimensions, and a stable melt entry path. DFM and mold flow analysis can help identify potential problems before tooling manufacture. Process validation is still required to confirm the finished part's quality.
Conclusion
Gate blush and jetting require different troubleshooting approaches, even though both can appear near the gate of an injection molded part. Gate blush is generally associated with localized surface changes around the gate, while jetting occurs when molten plastic enters the cavity as an uncontrolled stream.
Start by identifying the defect, checking material preparation and processing conditions, and running controlled trials. If the problem persists, review gate geometry, melt entry direction, and the overall mold design.
For new parts, early DFM review and mold flow analysis can help reduce the risk of costly rework. For existing molds, a systematic approach can help determine whether process optimization is sufficient or a tooling change is justified.
TEAM Rapid provides rapid tooling and custom plastic injection molding services for prototype, low-volume, and production applications. Reviewing gate design and process requirements early can help customers improve part quality and move from initial validation to repeatable manufacturing.
Explore TEAM Rapid's custom plastic injection molding services to learn more about its manufacturing capabilities.



 Contact