
Short Shot vs Flash in Injection Molding: Key Differences, Causes, and Solutions
Featured Snippet Summary: The main difference between short shot and flash is that a short shot occurs when molten plastic fails to completely fill the mold cavity, resulting in an incomplete part, whereas flash happens when excess plastic escapes the cavity, creating thin, unwanted layers along the parting line. Short shots are caused by flow restrictions and low pressure, while flash is caused by excessive pressure, poor clamping, or mold wear.
Introduction to Injection Molding Defects
Why Injection Molding Defects Matter
Defects in plastic injection molding lead to high scrap rates, increased production costs, and delayed time-to-market, directly impacting a company's bottom line and reputation.
Overview of Short Shot and Flash
Short shots and flash are two of the most prevalent defects in plastic manufacturing, representing opposite extremes of material flow and cavity packing.
Why These Two Defects Are Often Confused
Because both defects are heavily influenced by injection pressure, temperature, and mold design, inexperienced operators often misdiagnose the root cause when adjusting machine parameters.
Impact on Product Quality, Cost, and Production Efficiency
Unchecked defects compromise structural integrity, require costly secondary operations (like trimming flash), and drastically reduce overall equipment effectiveness (OEE).
What Is a Short Shot in Injection Molding
Definition of Short Shot
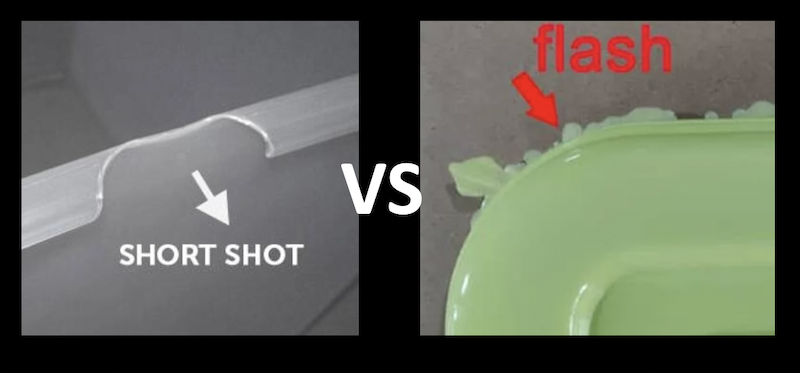
A short shot is a defect where the molten plastic polymer does not completely fill the mold cavity, resulting in a partially formed or incomplete plastic part.
How a Short Shot Happens During the Molding Process
It occurs when the plastic melt freezes off before reaching the extremities of the cavity, usually due to high viscosity, flow restrictions, or inadequate injection pressure.
Common Visual Characteristics of Short Shots
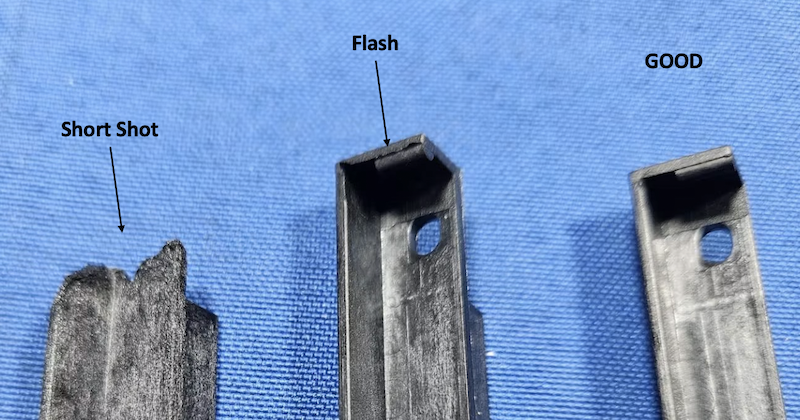
Visually, the part will have missing sections, blunt or rounded edges where sharp corners should be, and incomplete structural features like bosses or ribs.
Typical Areas Where Short Shots Occur
They most frequently appear in thin-walled sections, areas furthest from the gate, and deep blind pockets where air can become trapped.
Industries Commonly Affected by Short Shot Defects
Medical device manufacturing, automotive electronics, and consumer packaging often struggle with short shots due to the complex, thin-walled nature of their components.
What Is Flash in Injection Molding
Definition of Flash
Flash (or burrs) occurs when molten plastic escapes the mold cavity and seeps into the parting line, ejector pin gaps, or slider clearances, forming thin, unwanted plastic lips.
How Flash Forms in Injection Molding
It forms when the internal mold cavity pressure exceeds the mold's clamping force, or when the plastic's viscosity is too low, allowing it to flow into microscopic gaps.
Common Types of Flash Defects
Common types include parting line flash, ejector pin flash, slider flash, and vent flash, each requiring different mold maintenance solutions.
Typical Locations of Flash on Molded Parts
Flash is typically found along the main parting line, around holes (core pins), near ejector pins, and at the intersection of moving mold components.
Industries Commonly Affected by Flash Defects
Industries requiring high cosmetic finishes or tight assembly tolerances, such as consumer electronics and optical components, are highly sensitive to flash defects.
Short Shot vs Flash: Key Differences
Visual Appearance Comparison
Short shots result in missing material and incomplete geometries, while flash results in excess material extending beyond the intended part boundaries.
Root Cause Differences
Short shots are rooted in flow starvation and premature freezing; flash is rooted in excessive pressure, tool separation, or overly fluid melt.
Process Parameter Differences
Increasing injection pressure and temperature usually fixes short shots, but those exact same adjustments will exacerbate flash.
Mold Design-Related Differences
Mold design is important, short shots are often caused by inadequate gating or venting, whereas flash is frequently caused by poor parting line seals or insufficient mold rigidity.
Material Flow Behavior Comparison
Highly viscous materials are prone to short shots, while low-viscosity, high-flow materials are highly susceptible to flashing.
Effects on Product Performance and Appearance
Short shots compromise structural strength and functionality, while flash affects cosmetic appearance, assembly fit, and requires secondary trimming.
Inspection and Quality Control Differences
Short shots are easily caught by visual inspection and weight checks, while flash often requires tactile inspection or precise dimensional gauging.
Quick Comparison Table: Short Shot vs Flash
|
Feature |
Short Shot |
Flash |
|
Definition |
Incomplete filling of the mold cavity. |
Excess plastic escaping the cavity. |
|
Main Cause |
Flow restriction, low pressure/temp. |
High pressure, poor clamp, mold wear. |
|
Appearance |
Missing material, blunt edges. |
Thin, unwanted plastic lips or burrs. |
|
Typical Location |
Thin walls, furthest from gate. |
Parting line, ejector pins, sliders. |
|
Process Condition |
Starved, low energy. |
Overpacked, high energy. |
|
Mold Condition |
Poor venting, small gates. |
Worn parting line, tool deflection. |
|
Impact on Parts |
Structural failure, scrap. |
Assembly issues, cosmetic defects. |
|
Common Solutions |
Increase temp/pressure, improve vents. |
Lower pressure, increase clamp, fix mold. |
Main Causes of Short Shot in Injection Molding
Insufficient Injection Pressure
The primary driver; without enough pressure, the melt cannot overcome flow resistance to fill the cavity.
Low Melt Temperature
Cold plastic increases viscosity, causing the material to sluggish and freeze before filling the part.
Low Mold Temperature
A cold mold extracts heat too quickly, causing the plastic skin to freeze and halt the flow front.
Poor Venting Design
Trapped air creates a physical barrier (and potential diesel burns) that stops plastic from entering deep pockets.
Thin Wall Sections
Walls that are too thin for the selected resin cause rapid heat loss and high shear, restricting flow.
Improper Gate Design
Undersized or poorly located gates restrict the volume of plastic entering the cavity, leading to premature gate freeze.
Inadequate Material Flow
Using a low-flow grade resin for a complex geometry guarantees flow hesitation and short shots.
Small Shot Size
If the machine's barrel capacity or programmed shot volume is too small, the cavity will physically starve.
Material Viscosity Issues
High-viscosity materials require significantly more energy and pressure to move through the runner system.
Machine Capacity Limitations
Using a machine with insufficient injection speed or plasticizing capacity limits the ability to fill large parts.
Main Causes of Flash in Injection Molding
Excessive Injection Pressure
Too much injection or packing pressure can physically force the mold halves apart or push plastic out of the cavity.
Mold Parting Surface Damage
Dings, scratches, or debris on the parting line prevent a perfect seal, creating a pathway for flash.
Poor Mold Clamping Force
If the clamping tonnage is too low to withstand the internal cavity pressure, the mold will "flash open."
Worn Mold Components
Over time, slides, lifters, and core pins wear down, increasing clearances and allowing plastic to leak.
Excessive Melt Temperature
Overheating the plastic drastically lowers its viscosity, making it thin enough to seep into microscopic gaps.
Improper Vent Depth
Vents machined too deep will allow air to escape, but will also allow low-viscosity plastic to flow out.
Overpacking and Overfilling
Injecting too much material during the packing phase creates immense internal stress, forcing plastic out of the geometry.
Poor Mold Alignment
If the core and cavity are misaligned, the parting line will not mate flush, causing localized flash.
Tool Deflection During Injection
Thin or unsupported mold plates can physically bend under injection pressure, temporarily opening the parting line.
Material Degradation Issues
Degraded plastic breaks down into lower molecular weight chains, drastically lowering viscosity and increasing flash risk.
How Mold Design Affects Short Shot and Flash
Gate Size and Gate Location
Gates must be large enough to prevent premature freezing (short shot) but not so large that they cause overpacking (flash).
Runner Design Considerations
Balanced runners ensure uniform cavity filling; unbalanced runners cause some cavities to flash while others short shot.
Venting Design Optimization
Strategic venting prevents short shots by releasing air, but vent depth must be strictly controlled to the material's flash threshold.
Wall Thickness Design Guidelines
Uniform wall thickness prevents flow hesitation and localized overpacking, mitigating both defects simultaneously.
Parting Line Design
A robust, flat, and well-supported parting line is critical to maintaining a seal under high injection pressures.
Mold Steel and Rigidity
Using high-grade, hardened steel prevents tool deflection and parting line wear, which are primary causes of flash.
Cooling System Design
Efficient cooling ensures uniform shrinkage; poor cooling can cause localized warpage that breaks the parting line seal.
Draft Angle Considerations
Proper draft angles ensure smooth ejection, preventing drag marks that can damage the mold and lead to subsequent flash.
Process Parameters That Influence Short Shot and Flash
Injection Speed
Fast speeds reduce viscosity via shear heating (fixing short shots) but can cause turbulent flow and flash if not controlled.
Injection Pressure
Higher pressure fills thin walls but risks forcing the mold open; finding the exact pressure window is critical.
Holding Pressure
Holding pressure compensates for shrinkage; too little causes sink marks/short shots, too much causes flash.
Melt Temperature
Optimal melt temp ensures proper flow; too low causes short shots, too high causes flash and material degradation.
Mold Temperature
A hotter mold improves flow and surface finish but increases cycle time and the risk of flash in thin areas.
Cooling Time
Insufficient cooling time causes the part to warp or flash upon ejection; excessive cooling reduces efficiency.
Screw Back Pressure
Proper back pressure ensures melt homogeneity; too little causes inconsistent shots, too much degrades the material.
Clamp Force Optimization
Clamp force must be precisely calibrated to hold the mold shut without crushing the parting line or causing deflection.
Material Selection and Its Influence on Defects
High-Flow vs Low-Flow Plastics
High-flow resins fill easily but flash easily; low-flow resins resist flash but require high pressure to avoid short shots.
Material Shrinkage Effects
High-shrinkage materials require more holding pressure, which inadvertently increases the risk of flash.
Moisture Content and Drying Requirements
Wet hygroscopic materials create steam, altering viscosity and causing both splay and unpredictable flash/short shots.
Additives and Fillers
Glass fibers increase stiffness and reduce shrinkage but increase viscosity, raising the risk of short shots in thin walls.
Regrind Material Considerations
Excessive regrind degrades polymer chains, lowering viscosity and causing unpredictable flash and weak structural integrity.
Comparing Common Materials for Short Shot and Flash Risks
Understanding your resin is the first step in how to prevent short shot in injection molding and how to reduce flash in plastic injection molding.
Material Comparison Table
|
Material |
Short Shot Risk |
Flash Risk |
Flowability |
Recommended Applications |
|
ABS |
Medium |
Medium |
Good |
Electronics housings, automotive interiors. |
|
PP |
Low |
High |
Excellent |
Living hinges, containers, packaging. |
|
PC |
High |
Low |
Poor |
Lenses, high-impact structural parts. |
|
Nylon (PA) |
Medium |
High |
Good |
Gears, bearings, under-hood auto parts. |
|
POM |
Medium |
High |
Good |
Precision gears, zippers, mechanical parts. |
-
Talk with Our Injection Molding Engineers
Struggling with material selection or persistent defects? Talk with our injection molding engineers at TEAM Rapid to optimize your material and injection molding process parameters today.
How to Troubleshoot Short Shot Defects
Step-by-Step Troubleshooting Process
Start by verifying material drying, then check machine temperatures, increase injection speed/pressure incrementally, and finally inspect mold vents.
Parameter Adjustment Checklist
Increase melt temp, increase mold temp, increase injection speed, increase injection pressure, and optimize the switchover point.
Mold Inspection Methods
Check for blocked vents, undersized gates, or cold runners that might be restricting material flow.
Material Inspection Procedures
Verify the material lot's melt flow index (MFI) and ensure it has been dried to the manufacturer's exact specifications.
Machine Capability Evaluation
Ensure the machine has adequate barrel capacity, injection rate, and nozzle heater functionality.
Recommended Corrective Actions
If process adjustments fail, modify the mold by adding vents, enlarging gates, or increasing wall thickness in the CAD design.
How to Troubleshoot Flash Defects
Step-by-Step Troubleshooting Process
First, verify clamp tonnage, then reduce injection/holding pressure, lower melt temperature, and inspect the mold for damage or wear.
Clamp Force Verification
Perform a tonnage check to ensure the machine is applying enough force to keep the mold closed against cavity pressure.
Mold Maintenance Inspection
Clean the parting line, check for debris, and use blueing compound to verify perfect parting surface contact.
Pressure and Temperature Optimization
Reduce packing pressure and time, lower the melt temperature to increase viscosity, and slow down the injection speed.
Vent and Parting Surface Inspection
Ensure vents are not cut too deep and that the parting line has not been crushed or damaged by previous flashes.
Recommended Corrective Actions
If process fixes fail, the mold must be pulled for maintenance to re-machined the parting line, replace worn inserts, or add interlocks.
Inspection Standards for Short Shot and Flash
Visual Inspection Methods
Operators visually inspect parts under standardized lighting to identify missing material or visible flash lips.
Dimensional Inspection Techniques
Calipers, micrometers, and CMMs are used to ensure flash hasn't altered critical mating dimensions.
Functional Testing Requirements
Parts are assembled or tested to ensure flash doesn't interfere with moving parts or sealing surfaces.
Industry Acceptance Standards
Standards like SPI (Society of Plastics Industry) define acceptable cosmetic and dimensional tolerances for flash and fill.
Cosmetic Surface Evaluation
For Class-A surfaces, zero flash and 100% fill are mandatory, requiring strict magnified inspection.
Using GO/NO-GO Gauges
Custom gauges quickly verify if flash exceeds maximum allowable tolerances on high-volume production lines.
Automated Vision Inspection Systems
Camera-based AI systems automatically detect short shots and flash at high speeds, ensuring 100% quality control.
Preventing Short Shot and Flash in Production
Design for Manufacturability (DFM) Best Practices
Proper DFM ensures uniform walls, adequate draft, and optimal gate placement before the mold is ever cut.
Scientific Injection Molding Techniques
Decoupling fill and pack phases and monitoring cavity pressure ensures a robust, repeatable process window.
Mold Maintenance Strategies
Regular cleaning, lubrication, and parting line inspections prevent the gradual wear that leads to flash.
Process Monitoring Systems
Cavity pressure sensors and machine monitoring software alert operators to deviations before defective parts are made.
Operator Training Recommendations
Well-trained operators understand the rheology of plastics and avoid "band-aid" fixes that create secondary defects.
Real-Time Quality Control Methods
Automated weighing and vision systems provide real-time feedback to the injection molding machine.
Preventive Maintenance Checklist
Schedule regular checks for heater bands, non-return valves, toggle pins, and mold cooling lines to ensure consistent processing.
Case Presentations
Case Study 1: Solving Short Shot in Thin-Wall Parts
TEAM Rapid solved chronic short shots in a 0.8mm thin-wall medical housing by optimizing gate locations via Moldflow analysis and switching to a high-flow PC/ABS blend.
Case Study 2: Eliminating Flash in Multi-Cavity Molds
We eliminated parting line flash in a 32-cavity PP closure mold by upgrading the mold steel to H13, adding precision interlocks, and balancing the hot runner system.
Lessons Learned from Production Failures
These cases prove that attempting to fix mold design flaws with machine parameters is a losing battle; prevention through DFM and precision tooling is always more cost-effective.
Frequently Asked Questions About Short Shot and Flash
Can Short Shot and Flash Occur at the Same Time?
Yes, in multi-cavity molds with unbalanced runners, cavities closest to the sprue may flash while the furthest cavities short shot.
Which Defect Is More Serious?
Both are critical, but short shots generally result in immediate structural failure and 100% scrap, whereas flash can sometimes be salvaged via secondary trimming.
How Does Injection Speed Affect These Defects?
Higher speeds increase shear heating, reducing viscosity to fix short shots, but if too fast, it can cause turbulent flow and flash.
Can Mold Venting Solve Both Problems?
Proper venting solves short shots by releasing trapped air, but if vents are machined too deep, they will cause flash.
What Materials Are Most Sensitive to Flash?
Low-viscosity, high-flow materials like PP, Nylon, and POM are highly sensitive to flash and require precise mold clearances.
How Can Simulation Software Help?
Moldflow simulation predicts fill patterns, pressure drops, and clamp force requirements, allowing engineers to fix defects in the digital stage.
Conclusion
Summary of Key Differences Between Short Shot and Flash
Short shot is a defect of material starvation and flow restriction, while flash is a defect of material excess and cavity containment failure. Understanding this difference between short shot and flash is fundamental to plastic manufacturing.
Best Practices for Preventing Injection Molding Defects
The most effective short shot defect causes and solutions and injection molding flash troubleshooting guide strategies all point to the same truth: optimize the part design, maintain the mold, and use scientific processing.
Importance of Mold Design and Process Optimization
A robust mold design makes the injection molding process forgiving. Investing in high-quality tooling and rigorous DFM saves thousands of dollars in scrap and downtime.
How Professional Injection Molding Services Can Help
Partnering with an expert like TEAM Rapid ensures your project benefits from advanced Moldflow analysis, precision CNC machining, and scientific molding practices. We proactively eliminate defects before they reach the production floor.
Ready to Eliminate Molding Defects and Scale Your Production?
Get a Fast Injection Molding Quote today! Upload your CAD files to www.teamrapidtooling.com for a free DFM analysis, and let our engineering team build a flawless, high-precision mold for your next project.



 Contact